Big week - the fuselage kit will be delivered tomorrow, so I hustled to finish all non-fiberglass parts of the wing kit (it's DONE after almost 460hrs for two wings), and reorganized the workshop to make room for the fuselage crate. Specifically, I did the following:
- finished last 29 rivets with my wife riveting and me bucking; attached Aileron trim wires to molex connector and connected to harness; attached access panel
- riveted trailing edge for left aileron (done)
- reattached torque tube-to-bellcrank pushrod (right); attached aileron to left wing; attached bellcrank-to-aileron pushrod (left)
- fabricated and installed landing light lens
- right aileron: drilled all holes in stainless steel counterweight through skin and through nose ribs; attached nose ribs to counterweight; deburred edges of nose skin; dimpled top and bottom skins in areas of stiffeners and ribs (did it right this time!)
- riveted ribs and stiffeners to top and bottom skins; drilled trailing edge; finished dimpling everything; countersunk trailing edge; riveted doubler to spar
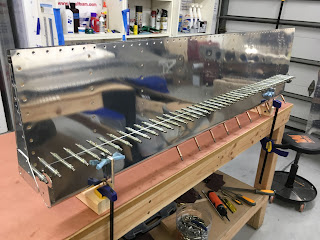
- riveted nose ribs to nose skin; riveted spar to nose ribs; riveted top skin and bottom skin to spar and nose skin; riveted main (side) ribs together; riveted counterweight to nose skin; riveted main ribs to spar
- riveted trailing edge, and located hardware to mount (once wing assembly is placed on stand)
attached aileron to right wing (and attached flap to right wing; just put time here)
Attached aileron trim tab to access plate and screwed in place (pushrods are all in neutral position when final installed!):
My wife helped me rivet the last 29 rivets I couldn't reach by myself - she does good work:
Final attachment of the torque tube-to-bellcrank pushrod:
Finished the left aileron:
Attached left aileron to left wing - here's the jig for neutral position. This jig and the bellcrank jig (not shown) have to both be in a specified position, and then the aileron is rigged. Supposedly this is WAY easier than the older kits, whereby the builder has to rig the ailerons after attaching the wings to the fuselage.
Left aileron, final-installed and torqued to spec:
Initial cuts of the acrylic for the right landing light lens - thanks, Ken B., for suggesting I use the bandsaw instead of a cutoff disk:
Drilled #30 holes in the plexi/acrylic - go slowly, use a plexi-bit, and you won't have any cracks. Also, Van's pull-the-tape method to try to get a snug fit just doesn't work. You should instead jam your hand in a rib lightening hole, and press firmly on the inside of the lens with your fingers ... while trying not to drill through your fingers. This lens looks better than the left, but neither is perfect. (At least the Van's factory bird's lens doesn't look any better than mine)
Right lens, installed:
Right aileron nose skin, getting its counterbalance match-drilled - Tap Magic worked better than pink Boelube this time:
My Pitot/AOA was getting little rust spots where it scraped the bottom skin during installation, so I cleaned the rust, prepped the metal, and primed the mast:
Riveting nose ribs to right nose skin; I'm glad I have 4 different yokes for my pneumatic squeezer - I think I used all of them for this task:
Riveting the top and bottom skins to the right aileron spar:
Blind-riveted right nose skin to counterweight. I love using the pneumatic blind-rivet tool - maybe my next project will be an all-pulled rivet airplane, like the RV-12?
Right aileron, completed:
Blurrycam selfie with the two completed wings:
Just the wings:
One more shot:


No comments:
Post a Comment