
Sunday, September 30, 2018
Section 9 - Elevators (riveting items to front spars)
I had a very productive Sunday, consisting mostly of riveting. Specifically, I riveted the tip ribs to each other and then to the front spar; hinge reinforcement plates, nutplates and root ribs to the front spar; counterbalance skins to tip ribs; and, elevator horns to the root ribs and front spar. Also installed a bushing for what I assume will serve as a conduit for wires that lead to the trim tab motor.

Friday, September 28, 2018
Section 9 - Elevators (riveting trim tab spar and horn; scuffing elevators for foam ribs)
The beginning of this week didn't have much to report - just riveting the trim tab spar and horns to the trim tab, as well as scuffing all 4 skins of the elevators and 2 rear spars to accept the prosealed foam ribs. I hope to accomplish more this weekend, when I have a little more time (busy week at work and with after-school kid activities).
Riveting of trim tab spar and horns:

Riveting of trim tab spar and horns:

Sunday, September 23, 2018
Section 9 - Elevators (trim tab; priming)
Today's task was to fabricate the trim tab to the point where I have to Proseal the foam ribs to the skins/spar ... but I'll actually hold, so I can do that part when I glue the foam ribs to the left elevator (i.e. don't waste the Proseal). I was almost to the point of riveting the trim tab horns, until I realized I wanted/needed to prime them prior to installation. So I ended up priming all the other parts that either were non alclad, or that I scuffed so much during fabrication that the alonized coating had worn off.
Most of the trim tab parts (there's not a lot to it) - not shown are one foam rib, the small trim tab horns, and the aft hinge:

Most of the trim tab parts (there's not a lot to it) - not shown are one foam rib, the small trim tab horns, and the aft hinge:

Saturday, September 22, 2018
Section 9 - Elevators (deburring, match-drilling, and a bunch of other tasks)
A lot of small, but (seemingly) important tasks happened since the last update, including bending close-out tabs on left skins, cutting right rear spar, drilling the 5/8" and 3/8" holes in left spar, clecoing (and then unclecoing) ribs and skins, match-drilling #30 and #40 holes as requires, and lots and lots of deburring of edges and all holes. Oy. Did I mention deburring? Finally, I dimpled the ribs, spars, trim motor access doubler, shear clip, etc., fashioned the trim tab horns and pushrod, countersunk the trailing edges and rear spars, and riveted nutplates. All this and more took about 21 hrs. I didn't take too many pictures of all these steps, but here are a few:
A couple holes needed this little bad boy (90deg angle drill attachment from Cleaveland Aircraft Tools):

A couple holes needed this little bad boy (90deg angle drill attachment from Cleaveland Aircraft Tools):

Monday, September 10, 2018
Section 9 - Elevators (initial prep; ribs; foam ribs; clecoing main structures)
Gathered all of the parts necessary for this section, which will build the elevators. It seems that building the elevators will be as involved as the three sections that preceded it combined, so I'm sure this section will take me quite a bit of time. Below are the smaller parts; not shown are the elevator skins, trim tab skins, lead weights, elevator horns, various hardware, and trim tab motor.


Sunday, September 2, 2018
Section 8 - Horizontal Stabilizer (riveting skins to front/rear spars, ribs, & stringers)
A few days have passed, but on-and-off during that time I made 4 cradles to hold the horizontal stabilizer, using plywood scavenged from the top of the empennage crate as well a few feet of 1" angle aluminum I bought from Van's last month "just in case I needed it." Then I riveted the remaining 3 nose ribs per side. The two inner nose ribs per side, which required bucking at the very forward of the skins, required quite a long monkey-arm to reach, as well as riveting in spurts by Braille (and visually checking, of course). Then, I found that the opposite side required learning how to rivet left-handed (i.e., gun in left, bucking bar in right). Surprisingly, not a lot of swearing, since I anticipated those ribs would be pains in the butt. Part of the reason I could rivet them at all is because of the tungsten bucking bar I got from Cleaveland Tool, which has a very high density; it's shit-ton expensive, but WELL worth the price paid. All surfaces can be used to buck rivets, which helps get it into some tight spots.
The most gratifying part of this section of the build was dropping the skeleton (front spar assembly, ribs, stringers) into the skins and clecoing the whole mess together, because NOW it looks very close to the final product:
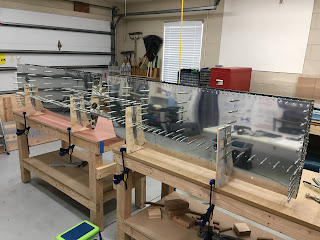
The most gratifying part of this section of the build was dropping the skeleton (front spar assembly, ribs, stringers) into the skins and clecoing the whole mess together, because NOW it looks very close to the final product:

Subscribe to:
Posts (Atom)