The following was also completed this week (from this point forward, I will cut/paste detailed tasks from my MS Excel log sheet, to make posting on this blog a little easier): riveted right tank baffle, installed fuel finger strainer and plug, and, installed fuel drain CAV-110 (all with Permatex #2); installed fuel cap; deburred long and short j-channels - lower; deburred holes in ADAHRS mounting bracket; dimpled j-stiffeners/channels; drilled and deburred nutplate attach holes; deburred edges of both lower skins; deburred holes in inboard and outboard lower skin; finished fabricating GMU-22 9pin ADAHRS connector; tapered and primed overlapping corners on forward part of lower skins; dimpled inboard and outboard lower skins; worked on Gretz pitot mount (made hole in skin, drilled skin, final holes drilled, dimpled, primed); riveted ADAHRS mount assembly together and to the j-stiffener.
Right fuel tank, nearly completed:
A picture of the filler cap, AND my mug to show the FAA:
Another view of the right tank:
Fuel finger strainer (right blue item) and plug (left blue item) installed with Permatex #2:
CAV-110 fuel drain installed with Permatex #2:
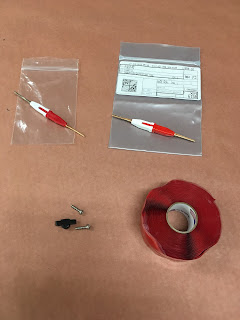
I had started to insert all 9 pins from the ADAHRS harness into the GMU-22 female plug/case ... however, I accidentally put the black wire where the black/white wire was supposed to go. I ordered an El Cheapo extractor (top left) that was supposed to be used on "d-sub" connectors. It probably is useful for some of those connectors, but not the ones I had ... another lesson learned - there are multiple pins/connectors colloquially referred to as "d-sub!" Subsequently, I researched the exact pin type for the ADAHRS bracket connector pins, and bought the extractor on the top right. Looks the same as El Cheapo, but much higher quality ... and it fits the pins for that connector. I guess RS232 is a more appropriate term for these pins, since that's the name of the extractor that worked for them. With the correct tool, it took 15 seconds to extract the mis-pinned wire and insert into the correct hole. Also shown below is a roll of self-adhering silicone tape - if you can't use heat-shrink tubing on wires (e.g. heat gun will melt neighboring plastic parts, as in my case), or you forgot to use heat-shrink tubing prior to connecting wires, this is the next best thing:
All pins are now in their proper holes. I triple checked, making sure to trace each wire back to its source on the ADAHRS harness root:
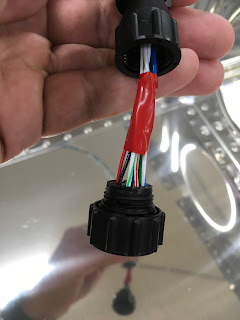
A little of that silicone tape, wrapped on the wires for strain relief:
Voila! A neatly wired ADAHRS harness:
Left bottom wing skins (inboard and outboard) - I had to file down the forward skin overlaps similar to the top skins, and thus primed those two locations:
Lower inboard skin, dimpled:
Back to the right fuel tank - leak testing revealed no leaks! I also learned that I should remove the pump, since that turned out to be a leak point when it was connected to the schraeder valve:
Soaping and checking for bubbles:
Other side. NO LEAKS at all.
Back to the left wing - I'm still working with the Gretz pitot mount; here I've match-drilled the mounting bracket through the 4 spar holes:
I match-drilled the Gretz bracket's holes into the lower outboard wing skin - a major commitment. Measured 5 times, cut once. Here I've inserted the mount, bracket and spacer to ensure fit:
Picture of the bracket hole, enlarged to final size:
Deburring lower skins - this is one of the first times the instructions specifically state to deburr the skin holes. I (almost) always deburr the sharper side of final-size Van's-punched holes anyway:
Match-drilled the 4 outboard holes from the bracket into the rib-attached L-bracket that I created last week.
Dimpled all holes in both skins (forgot to take pic of outboard skin); waiting for final installation onto wing:
ADAHRS mounting assembly/bracket, riveted:
... and attached to the j-stiffener:
Primed remaining parts for the Gretz pitot mount. The mast is not stainless, so I removed as much rust from the inside as possible, and primed the inside of the mast, the entire bracket, as well as the first 0.5" of the outside of the mast. The rest of the external part of the mast can be handled by a professional paint crew. The bracket and spacer were man-handled too much, working off the alclad, so they got primed as well:


No comments:
Post a Comment