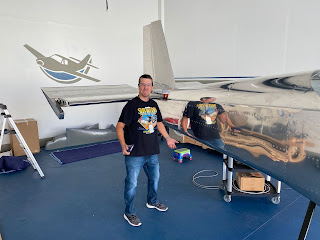
Although I haven't updated this blog for a month, a LOT of major milestones were achieved. First and foremost, my buddies, Ken B., Shane B., Mark A., and Glenn M. (all RV-14 or RV-14A builders) descended upon my hangar last week to help me install the wings. Ken B. helped me a few days prior install most of the tail feathers. Together, it really looks like an airplane - I couldn't be more pleased with the progress ... and also that I got to hang out with my RV friends one more time. Wish they all lived a lot closer. A bunch of other smaller projects were completed - I'm at the 90% done, 90% to go phase, which means that every time I complete one task, two more get added to the list. Here are what I accomplished this past month (not a lot of pics, but a lot was done):
- cleaned garage, organized for next part of project, drained compressor; painted 3 closeout panels for interior
- installed shelves in hangar, moved more stuff to hangar
- worked on VS and rudder fairings - made 2-ply backing for VS fairing as well
- trimmed backing for VS fairing; floxed to VS fairing
- sanded VS fairing; temporarily installed rudder to VS to check fit of rudder and to check fit of VS fairing. Needed to flox and sand the aft part of the fairing to clear rudder forward counterweight section. Added flox today
- cleaned garage some more, moved last big stuff to hangar with wife - hopefully last Uhaul trip for this project!
- moved more stuff to hangar - about 90% complete (the move, anyway); organized hangar and new tool chest/tools
- finished moving stuff to hangar and organized hangar - she’s ready to go!
- worked on empennage attach - elevators attached temporarily to work out spacing, massaged leading edges to get +30deg/-25deg clearance with no binding/rubbing
- final-drilled elevator horns - measure 10x, final-tighten the rod end bearing jam nuts (!), measure 100x, then drill 2 holes. Sounds simple, but many a builder has screwed up this part, had to weld the holes shut, and try again. Thanks to Ken B. for telling me to clamp the wooden block for the lower hole extremely tight!
- installed HS, elevators, and VS to fuselage with Ken B.!
- Final-torque 4 of 5 elevator bolts; attached pushrod to elevator horns; filed elevator stops to get at least +25deg/-20deg of travel; attached flap pushrods to wings; drilled 4 holes and installed snap bushings for OAT probe
- hung rudder and attached rudder cables; finished rigging elevator pushrods, including ensuring control sticks don’t interfere with anything on the panel
- finished wiring elevator trim tab and checked function and deflections; started final-installing pitot/AOA (had to bend around control rod)
- Attached wings with Ken B., Shane B., Mark A., and Glenn M. - great to see my RV-14(A) buddies again, and thanks for all your help!
- finished installing pitot/AOA tubes in the wing, and routed them behind the panel; routed RG-400 for Archer Nav antenna from wing to behind panel
- Installed grounds from wing to fuselage; connected pitot heat to molex connector; worked on flaps
Attaching the top rudder fairing:


No comments:
Post a Comment