Monday, July 27, 2020

43 - Engine Installation (misc. install.); 44 - Spinner & Propeller (installed prop.); 45 - Cowling (installing Skybolt camlocs)

This is my 100th blog entry, and it has a lot of small tasks related to the Finish and FWF kits.  Specifically:

- installed fuel servo; loosely installed a lot of adel clamps to engine and mount; attached starter cables to starter; worked with Steve from Aircraft Specialty to install VA-102 hose (needed to clock the fitting on the fuel pump differently than Van’s instructions); installed fuel flow red cube and hoses/connections that lead from fuel pump to fuel servo to fuel spider; installed VA-139 only to fuel pump (needs to be loose now, so I can install exhaust system later)
- installed throttle cable bracket; installed alternator and belt; installed a few more adel clamps
installed spinner plate assembly to propeller; installed propeller to engine (final-torqued and safety-wired); installed forward spinner bulkhead
- filed spinner openings to fit prop blades; sanded areas that contact the spinner bulkheads, and then brushed on thin layer of epoxy
- Prepped cowling; attached upper cowl to fuselage to measure distances for Camloks; started figuring out how Camlocs are installed
- trimmed camlocs, remeasured camloc distances, and match-drilled one half of them to fuselage
- match-drilled remaining camlocs, and removed, deburred, countersunk, and riveted them to upper fuselage; bent camlocs so upper cowl sits flush; started fitting of upper cowl to fuselage, including measuring and trimming of aft edge (lots of remove & reinstall steps)
- finished filing aft edge of top cowl (tight fit of 0.001-0.032”, per painter, so his crew can finish down to spec); match-drilled #30 holes into camloc drill guides using Mark A.’s “3 line” technique; upsized holes to 15/32”, sanded w/ dremel to just fit the grommets; attached temp o-ring retainers to grommets; riveted receptacles to flanges and temp. screwed all camlocs with the pins still engaged (i.e. “unlocked”) - all top cowl camlocs seem to work well!
- installed camloc flanges on the sides and lower part of fuselage

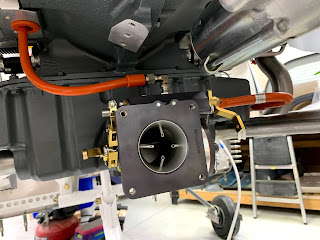
Installed fuel servo, and Aircraft Specialty Fuel lines with integrated fire sleeves:
Tuesday, July 14, 2020

40A - Gear & Engine Mount (nose gear & wheel); 46A - Leg & Wheel Fairings (intersection and nose gear fairings); 43 - Engine Installation (mounted engine to fuselage!)

The engine has been mounted to the fuselage!  All other crap I did the past two weeks was incidental to this major milestone - and thanks to Ken B., the install went quite smoothly.  Prior to that, I had received the nose gear leg and installed the nose gear and wheel, and did a bunch of composite work.  I'm really not a fan of fiberglass - almost a month of working on the 13 fairings for the wheels/legs and I'm still not quite finished. But, with the engine on, I'll be moving on to engine-related tasks for a while.  Here is what was accomplished during the past two weeks:

- installed nose gear leg and link assembly
- installed axle flange and nose fork, torqued the -24 nut until ~30lb of force felt per pulling with a fish scale (a little more than 26lb required, since will loosen over time); installed nose wheel
- removed intersection fairings and sanded/trimmed; floxed a lug to encase nut that attaches the training edge of each upper intersection fairing
- removed tape and excess flox from nut lugs; #27 drilled and #40 countersunk upper intersection fairings (attached to fuselage); removed main wheel fairings, and reattached halves with screws; drilled and deburred holes for nutplates in fairings; countersunk holes for nutplates
- figured out how to get fuselage into level flying position whilst having the nosewheel barely touching the ground; drew longitudinal center line on garage floor; marked standoff locations; aligned nose wheel fairing
- Cut slot in nose wheel fairing; aligned fairing in pitch; drilled bracket holes (magnet technique) and standoff pilot hole; tapped bracket holes; drilled standoff holes to just under 1” wide (will finish later, after - I received the proper screws to hold standoffs - was using shorter screws with washers for the initial fits); floxed brackets to nose wheel fairing rear
- Final drilled nose wheel fairing to brackets; installed nutplates to brackets; primed brackets; attached brackets to wheel fairing and attached to nose wheel; final fit of fairing (needed trimming to clear nose gear leg through the wheel’s range of motion)
- trimmed and aligned nose gear leg fairing; drilled nose gear leg fairing and hinge
- deburred, countersunk and riveted hinge halves to nose gear leg fairing; started initial fit of fairing (trimming, fitting, trimming again…)
- drilled #19 holes in fairing to attach to nose gear leg; attached nutplates to nose gear leg; final-trimmed fairing
- installed last oil fitting; cleaned and prepped workshop to install engine; installed engine onto dynafocal mount (w/ Ken B.!)

Floxed intersection fairings, installed on fuselage and wheel pants, and then removed them to trim:

Wednesday, July 1, 2020

46A - Leg & Wheel Fairings (main and nose wheel fairings, intersection fairings, leg fairings)

Since I was still waiting for the nose gear, I begrudgingly trudged through 12 of the 13 fiberglass pieces that comprise the leg and wheel fairings.  Lots of progress on most of these parts ... and a very dusty workshop from sanding and sanding and sanding fiberglass.  Be resigned to have dust everywhere for a while. Specifically, I completed the following during the past ~12 days:

- finished fitting right gear fairings to each other; #40 match-drilled; cutout gear leg clearance hole; ensured all could be installed on right wheel/gear; floxed all 4 brackets to gear fairings and loosely attached with screws (did this process off the plane, since there was no way to verify proper seating of bracket if on plane)
- cleaned up floxed brackets; drilled, countersunk and riveted nutplated to aft fairings; drilled #27 and countersunk holes in forward fairings; both main wheel fairings are ready to mount onto plane
trimmed nose fairing halves; marked and drilled holes #40 into nose fairings; fabricated “v block”
- leveled nose wheel fairing and marked;  fabricated spacer and deburred bracket and located nutplates on bracket; lots of contemplation about this fairing
- checked main gear fairings for twist; secured trailing edges; modified hinge halves; drilled, clecoed and deburred hinges into one of the main gear fairings
- countersunk and riveted hinges to first main gear fairing; bent hinge pin and drilled hole for safety wire; completed all tasks for the 2nd main gear fairing
- worked on all 4 intersection fairings for the main gear (lots of sanding)
- attached main gear fairings with screws (they fit!); attached leg fairings and intersection fairings (on/off to prepare for drilling); drilled right intersection fairings
- drilled left intersection fairings; sanded all 4 intersection fairings (80grit); floxed two upper intersection fairings and installed loosely with #6 screws; received and opened crate with nose gear leg
- floxed and clecoed lower intersection fairings to main wheel fairings

The four main gear fairing halves, at some intermediate stage of completion: